Hello everyone!
I notice that some people struggle with building, and often times they'll ask for help on building their homes and apartments. In this little "tutorial", I'm going to do a small walkthrough on how you can turn an empty apartment into a neatly decorated home for one!
STEP 1: LAYOUT
Before beginning your apartment, think of what you actually will need. Most apartments have four main components. A bathroom, bedroom, kitchen, and living room. While this space may appear small, you will be able to fit everything you need inside of it and still make a lovely looking apartment!
Since this space is rather small, the height will help compensate for the length and width. We're going to create a small loft that will cover half the apartment. I would encourage the use of slabs in this instance to have a slightly higher ceiling.
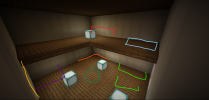
In this image above, you can very easily see the preferred layout.
YELLOW = Staircase
BLUE = Bed
ORANGE = Kitchen
LIME = Living room/TV area
GREEN = table
RED = Desk space
PURPLE = Bathroom
Now that we have all of that covered, let's get to the decoration.
STEP 2: DECORATION
Let's begin with minimal decoration before we detail. We'll get the logistics of the loft first.
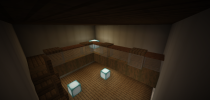
First, I created the staircase from the far left, then replaced the outer layer of slabs with stripped spruce wood. Then I went on to create a railing of my choice. In this instance I went with a light gray stained glass railing with brown carpet and spruce trapdoors.
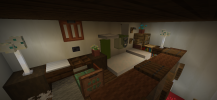
In this image, I made a traditional japanese cot with snow and some quartz slabs. Given that a normal bed would effect the height of the apartment I went ahead and did this type of bed. I also added some bookshelves behind it, and a desk right next to it. On the opposing wall I added an extra layer of bone blocks for more detail, which will be explained in this next screenshot.
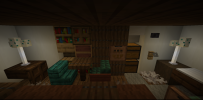
As you can see from the extra layer I added, I was able to put a lot more detail into the wall, and make it look a bit more flashy. I also added a little space for storage as well as a table for eating!
Now I'm going to take a look at the bottom floor and see what all I can do there before we go into detailing.
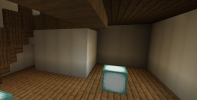
Under the loft, I created a 3x4 bathroom space. This will make room for a small shower, a toilet, and a sink. We'll go into arranging that shortly. Notice how I moved the bathroom door to underneath the staircase. This is to simply have it out of the way, and make room for decorating that empty wall there!
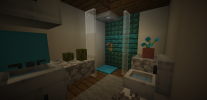
I was able to fit a sink, toilet, and shower inside this small space! Above the sink is a secondary sink which will act as more of a cabinet rather than an area where you can wash your hands.
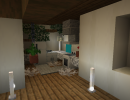
In the back corner here I decided to place the kitchen. It's got everything you need from a fridge to an oven! I also added another bone block wall on the side there for when we begin the living room area. Adding leaves and trapdoors is always a good touch, however don't add too many otherwise your home will look overgrown and claustrophobic!
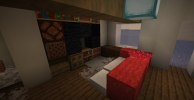
Next to the kitchen is of course the living room! I mixed a few blocks from the red category and added some slabs and snow for the couch. For the TV I mixed black colored blocks together and added some shelves and speaker looking blocks.
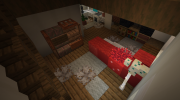
For the remainder of the empty space, I added a shelf for shoes or miscellaneous items, a carpet, and lamp by the doorway. Now that we have the basics down, let's move to...
STEP 3: LIGHTING
Lighting is one of the most difficult aspects to get a grasp on. I struggle with it myself! Now.. how do you create a nice looking apartment with lighting that doesn't stick out like a sore thumb? There's many options, one of the more popular ones being the classic end rod with turtle eggs on top! That's seen quite often throughout my build here, but there are plenty of other options!
LANTERNS:
Lanterns are easy to use! Try matching them up with chains when you're building your place! They work both sitting on a shelf or hanging from the ceiling!
SEA LANTERNS:
They're not my FAVORITE light source in the world, however they can look nice underneath specific trapdoors and as long as they're pretty out of the way!
END RODS:
Can pretty much go anywhere. You can match them with trapdoors, flower pots, turtle eggs, and more!
GLOWSTONE:
Same as sea lanterns, however I wouldn't use them too often if I'm being completely honest. But that's just preference!
TORCHES:
No.
STEP 4: (THE FINAL STEP) DETAIL
Alrighty! Now, whatever blank areas you may spot in your apartment you'd very well be able to fill in with shelves, leaves, banners, and more! I'd include more screenshots, however I've already reached the maximum amount that I can post here :(. I'll send more in a reply though!
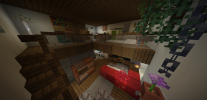
And here we are! One finished apartment!
Please keep in mind that you DO NOT HAVE to follow this guide! It is simply for those who wish to follow the SRP build style and want to learn more in regards to how us SRP builders work our magic with interior decorating! Any block can be used whilst decorating your home so please don't be afraid to branch out and do what YOU want to do!
I hope you all found this guide somewhat educational, and have fun building!
Yes I changed some blocks in the final picture and this probably looks like one of those art tutorials where they draw a circle and it suddenly becomes a detailed self portrait in 3 seconds.
I notice that some people struggle with building, and often times they'll ask for help on building their homes and apartments. In this little "tutorial", I'm going to do a small walkthrough on how you can turn an empty apartment into a neatly decorated home for one!
STEP 1: LAYOUT
Before beginning your apartment, think of what you actually will need. Most apartments have four main components. A bathroom, bedroom, kitchen, and living room. While this space may appear small, you will be able to fit everything you need inside of it and still make a lovely looking apartment!
Since this space is rather small, the height will help compensate for the length and width. We're going to create a small loft that will cover half the apartment. I would encourage the use of slabs in this instance to have a slightly higher ceiling.

In this image above, you can very easily see the preferred layout.
YELLOW = Staircase
BLUE = Bed
ORANGE = Kitchen
LIME = Living room/TV area
GREEN = table
RED = Desk space
PURPLE = Bathroom
Now that we have all of that covered, let's get to the decoration.
STEP 2: DECORATION
Let's begin with minimal decoration before we detail. We'll get the logistics of the loft first.

First, I created the staircase from the far left, then replaced the outer layer of slabs with stripped spruce wood. Then I went on to create a railing of my choice. In this instance I went with a light gray stained glass railing with brown carpet and spruce trapdoors.

In this image, I made a traditional japanese cot with snow and some quartz slabs. Given that a normal bed would effect the height of the apartment I went ahead and did this type of bed. I also added some bookshelves behind it, and a desk right next to it. On the opposing wall I added an extra layer of bone blocks for more detail, which will be explained in this next screenshot.

As you can see from the extra layer I added, I was able to put a lot more detail into the wall, and make it look a bit more flashy. I also added a little space for storage as well as a table for eating!
Now I'm going to take a look at the bottom floor and see what all I can do there before we go into detailing.

Under the loft, I created a 3x4 bathroom space. This will make room for a small shower, a toilet, and a sink. We'll go into arranging that shortly. Notice how I moved the bathroom door to underneath the staircase. This is to simply have it out of the way, and make room for decorating that empty wall there!

I was able to fit a sink, toilet, and shower inside this small space! Above the sink is a secondary sink which will act as more of a cabinet rather than an area where you can wash your hands.

In the back corner here I decided to place the kitchen. It's got everything you need from a fridge to an oven! I also added another bone block wall on the side there for when we begin the living room area. Adding leaves and trapdoors is always a good touch, however don't add too many otherwise your home will look overgrown and claustrophobic!

Next to the kitchen is of course the living room! I mixed a few blocks from the red category and added some slabs and snow for the couch. For the TV I mixed black colored blocks together and added some shelves and speaker looking blocks.

For the remainder of the empty space, I added a shelf for shoes or miscellaneous items, a carpet, and lamp by the doorway. Now that we have the basics down, let's move to...
STEP 3: LIGHTING
Lighting is one of the most difficult aspects to get a grasp on. I struggle with it myself! Now.. how do you create a nice looking apartment with lighting that doesn't stick out like a sore thumb? There's many options, one of the more popular ones being the classic end rod with turtle eggs on top! That's seen quite often throughout my build here, but there are plenty of other options!
LANTERNS:
Lanterns are easy to use! Try matching them up with chains when you're building your place! They work both sitting on a shelf or hanging from the ceiling!
SEA LANTERNS:
They're not my FAVORITE light source in the world, however they can look nice underneath specific trapdoors and as long as they're pretty out of the way!
END RODS:
Can pretty much go anywhere. You can match them with trapdoors, flower pots, turtle eggs, and more!
GLOWSTONE:
Same as sea lanterns, however I wouldn't use them too often if I'm being completely honest. But that's just preference!
TORCHES:
No.
STEP 4: (THE FINAL STEP) DETAIL
Alrighty! Now, whatever blank areas you may spot in your apartment you'd very well be able to fill in with shelves, leaves, banners, and more! I'd include more screenshots, however I've already reached the maximum amount that I can post here :(. I'll send more in a reply though!

And here we are! One finished apartment!
Please keep in mind that you DO NOT HAVE to follow this guide! It is simply for those who wish to follow the SRP build style and want to learn more in regards to how us SRP builders work our magic with interior decorating! Any block can be used whilst decorating your home so please don't be afraid to branch out and do what YOU want to do!
I hope you all found this guide somewhat educational, and have fun building!
Yes I changed some blocks in the final picture and this probably looks like one of those art tutorials where they draw a circle and it suddenly becomes a detailed self portrait in 3 seconds.


