
HOW TO USE PMC
A guide by Zrle
This is my guide to utilizing every single part of PMCskin3D. This goes over every single little tool that PMC has to offer, so that way anyone can be knowledged on the tools it offers.
Also SHOUTOUT to Noss and all the other Skindex users who are the reason I’m making this guide. PMC has a large variety of tools that are made to help you, not be complicated.
ADDITIONALLY, all of these tools can be found simply by scrolling down while having PMC open, and it has its own guide. This is for me to use as a reference so that way I can make shading guides, and other people can use this as a reference if I mention a tool they don’t know.
Table of Contents
Introduction
Tool Explanation
Tool Explanation
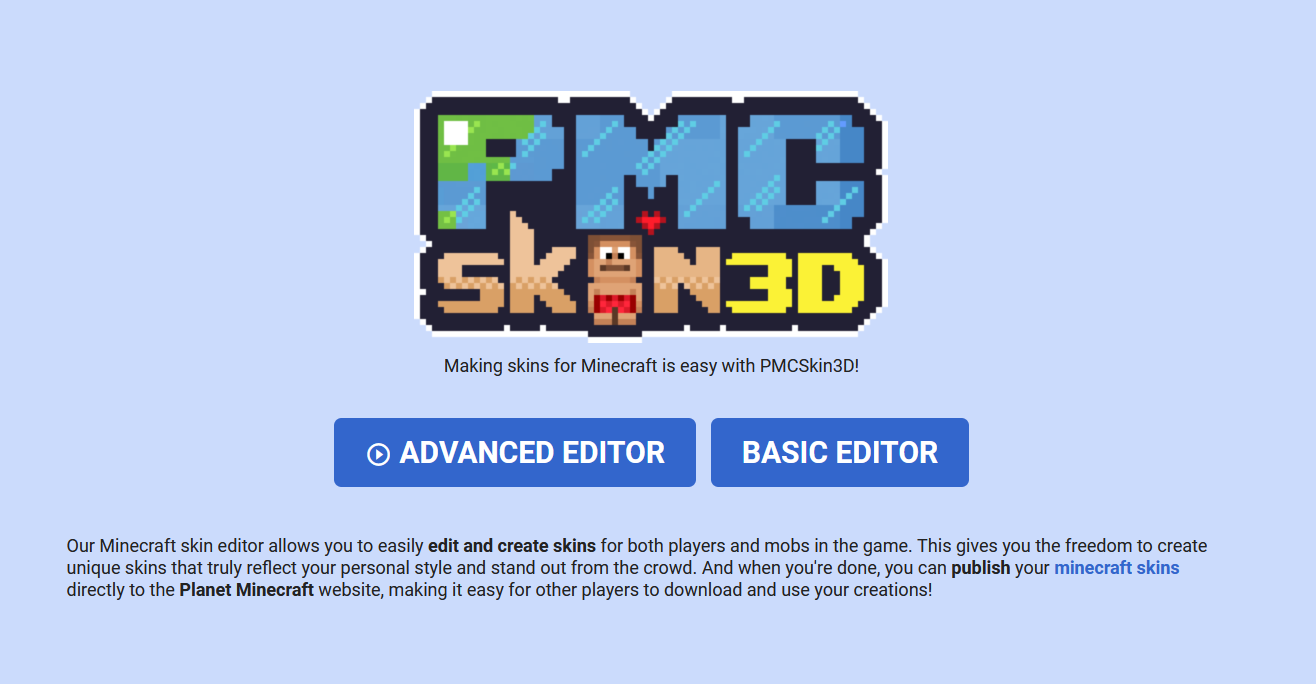 This is the login screen, you want to make sure to click “Advanced Editor” to get all of the features of PMC that I will mention.
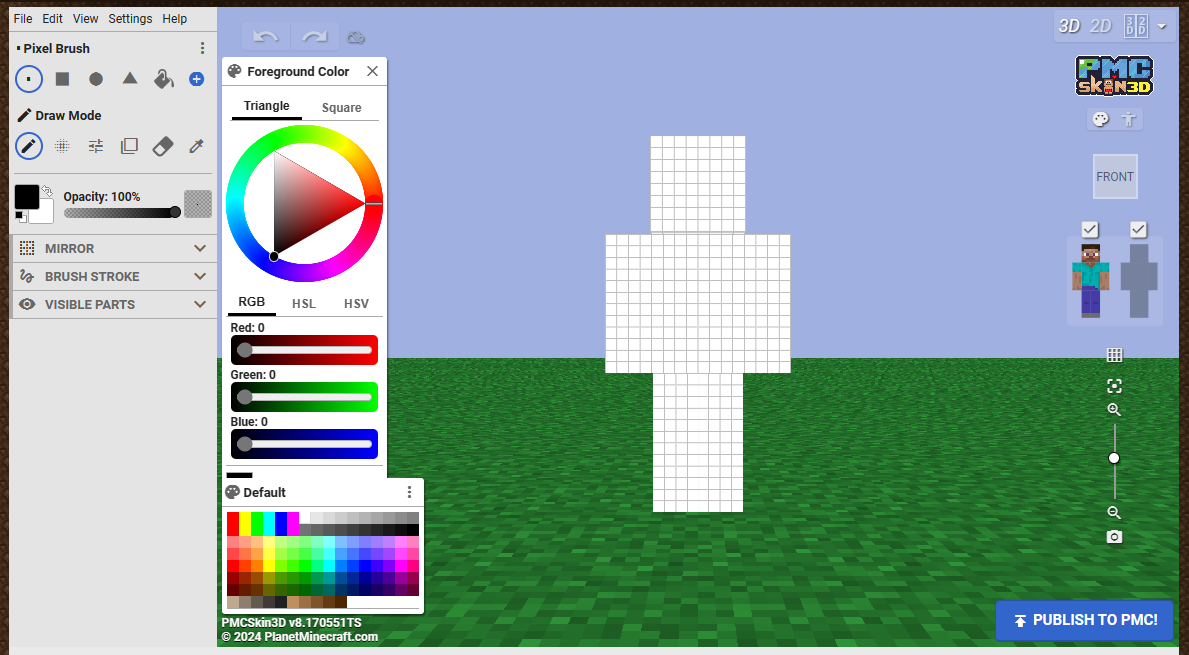
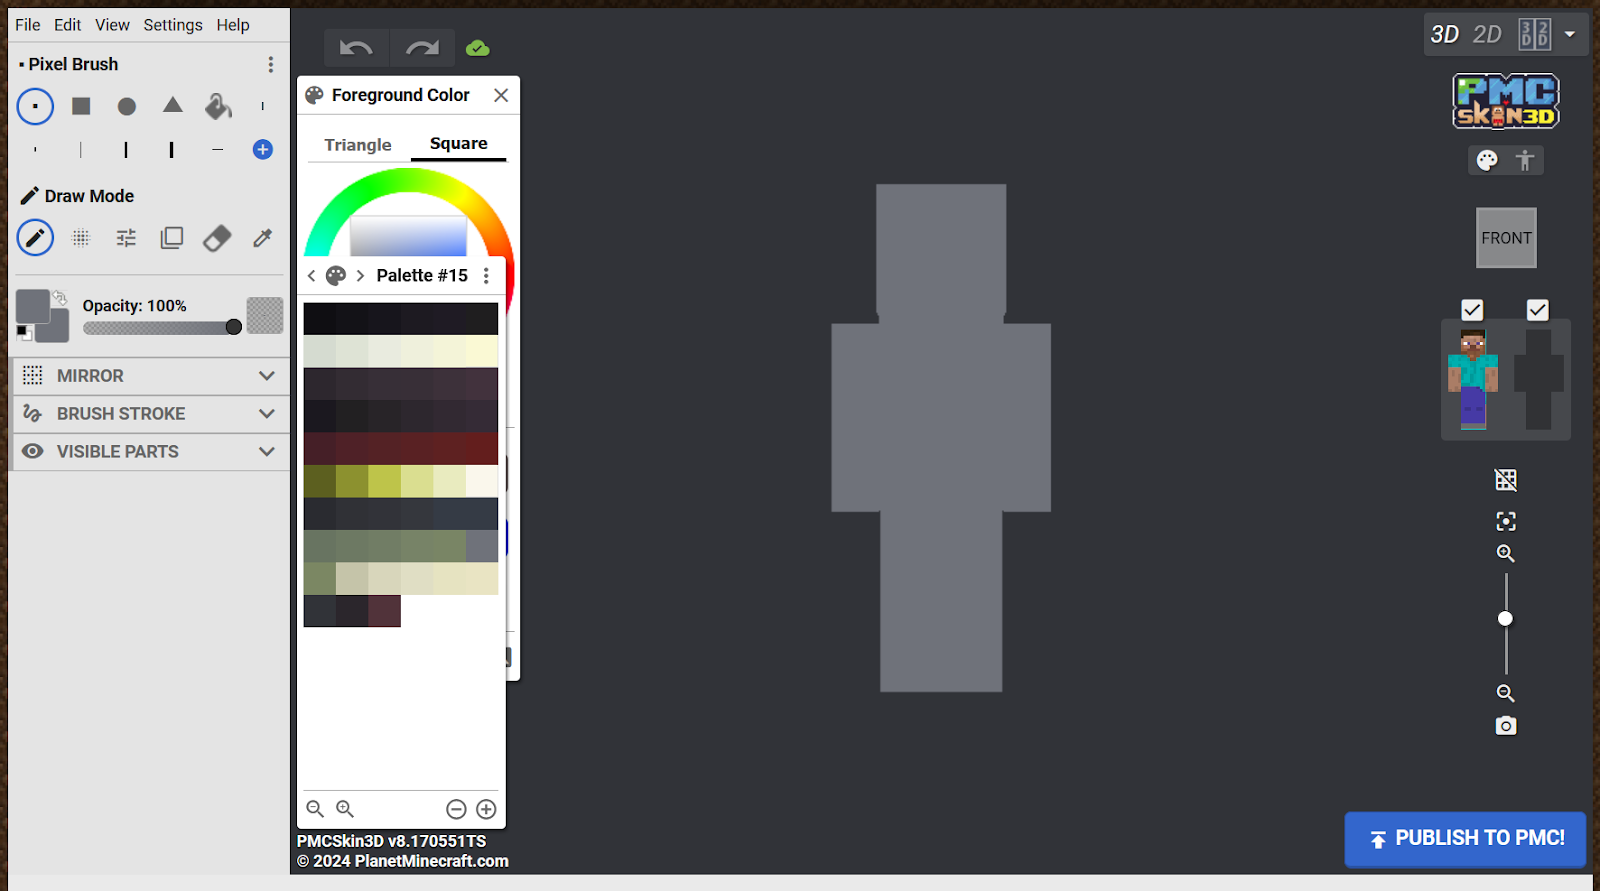 Starting it up, this is what my view looks like. Yours will look a little different, more like this
 Let’s take a look at what all these features are. Starting up with the top left corner, we have your basic computer commands.
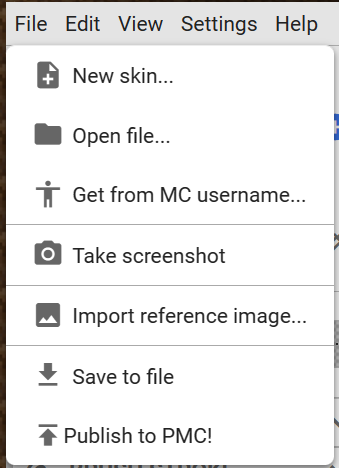 ✮ New Skin - Creates a brand new skin from your color of choosing. The color will be your “background color” which I will mention later.
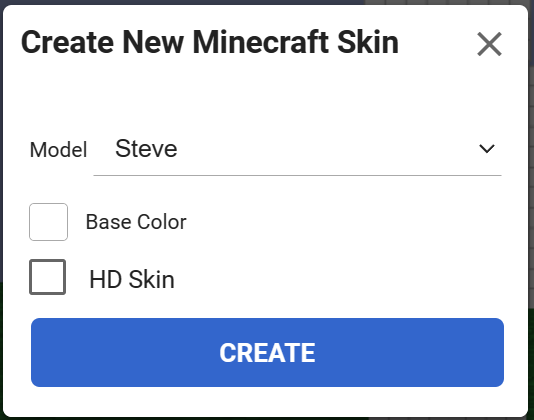 Hitting the drop down of the “Model” option will allow you to choose between the Steve Model (4 pixel arms) and Alex Model (3 pixel arms). The “simple” option does not allow overlays! DO NOT USE SIMPLE MODEL!!
HD Skin Option will allow you to create an “HD skin” which is basically a higher quality skin, with more pixels to work with.
✮ Open File - Will allow you to open a pre-existing skin, once again, you can choose the specific details of your skin.
Get from MC username - exactly what it sounds like, it will take the current skin from a username.
Take screenshot - Just takes a screenshot of your workspace, and the skin!
✮ Import Reference Image - This will take an image you have, and have it open as an image next to your skin. Hovering over any part of the image will copy the color into your foreground color
You can adjust the size of the image and move it around by hovering over the name, and when you don't need it, click the X button.

✮ Save to file - Downloads skin file as an image.
Publish to PMC - Will bring up controls to set your image up on your PMC profile
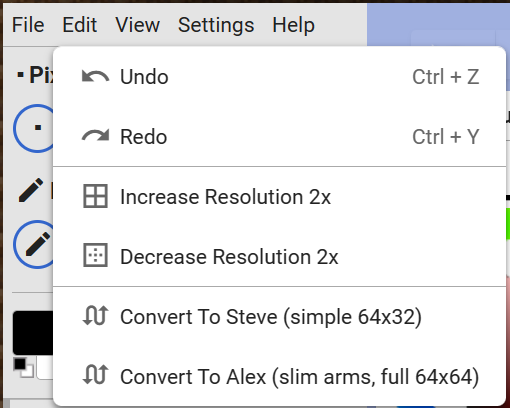 ✮ Undo - Goes back to where you were before your latest brush stroke.
✮ Redo - Goes forward to where you were before latest undo.
Increase Resolution 2x - Will divide each pixel into 4, making it a higher quality skin, (HD skins)
Decrease Resolution 2x - Will take existing 4 pixels and combine them into one, making the skin have less quality, or appear “blockier”
Convert To Steve - Will take existing skin and make the arms pixel one bigger.
Convert To Alex - Will take existing skin and make the arms pixel one smaller.
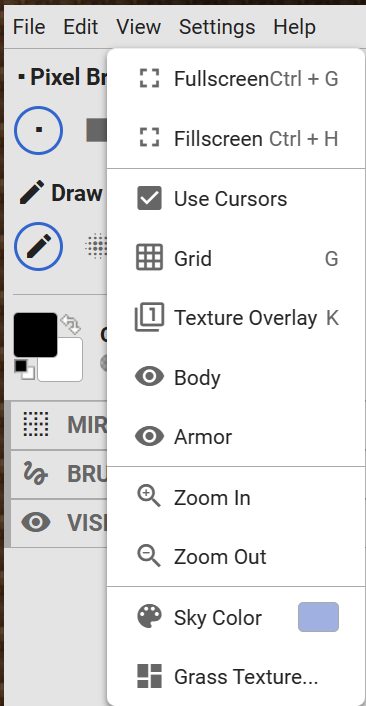 Fullscreen - Will make the web-page fullscreen.
Fillscreen - Will make the web-page fit your screen better, though it glitches so I wouldn’t use it.
Use Cursors - Will give the cursor a “ + “ symbol, versus the normal curser.
Grid - Will give the model a grid, I recommend not using this as it makes it harder to see what you’re doing.
Texture Overlay - Honestly. I have no idea what this does. It’s not important.
Body - Turns a body visibility off / on
Armor - Turns a overlay visibility off / on
Zoom In - Manually zooms you closer into the figure. Also can be done with scroll wheel.
Zoom Out - Manually zooms you further from the figure. Also can be done with scroll wheel.
Sky Color - Changes the background color.
Grass Color - Changes the grass texture, you can also remove it here!
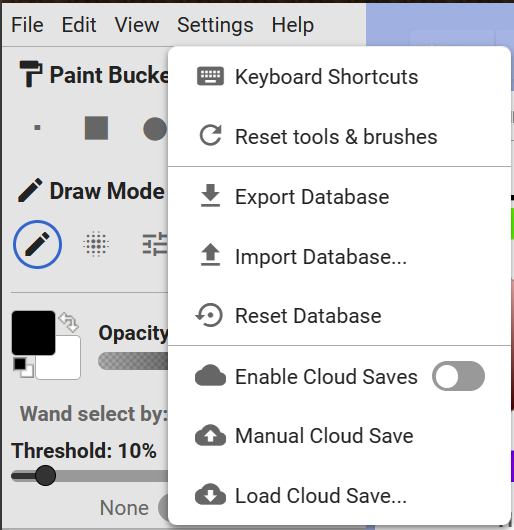
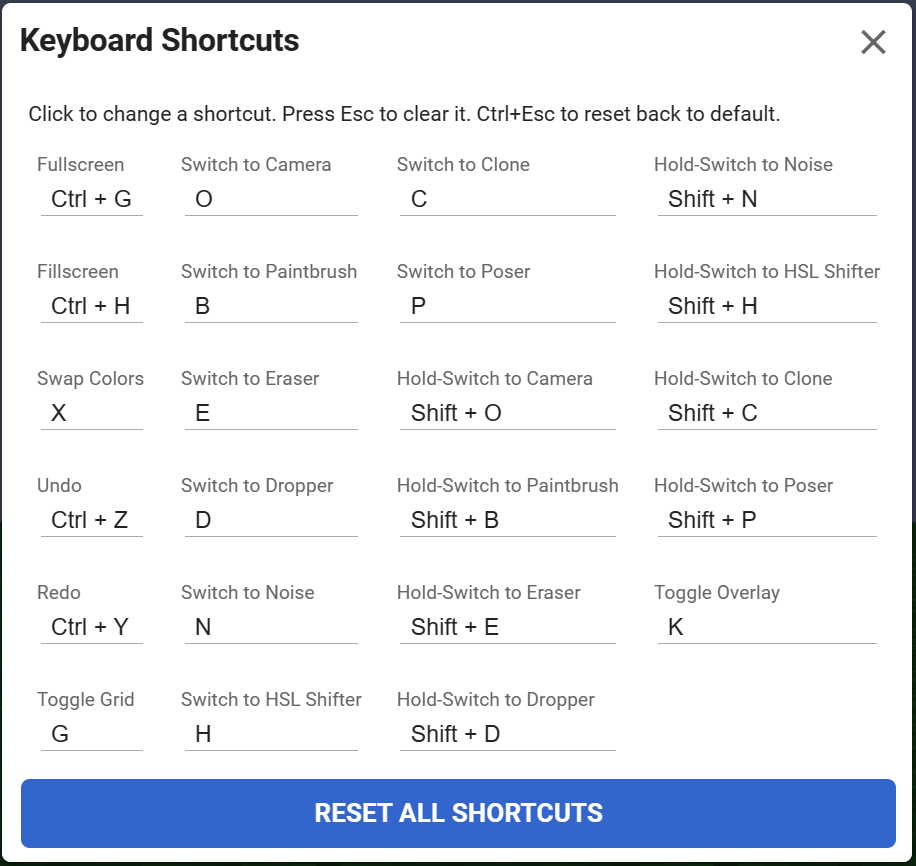
✮ Keyboard Shortcuts - Brings up a menu to view current key shortcuts, you can also change them here.
Reset tools & brushes - What it sounds like, it will reset your station.
Export Database - What it sounds like, it will take your data and export it into a file.
Import Database - What it sounds like, it will take a data file and replace your current data with it.
Reset Database - What it sounds like, it will erase all current data.
Enable Cloud Saves - Will load up a cloud to save it to. I don’t recommend this, rather export your file as it is more secure and less buggy.
Manual Cloud Save - Creates a save in the cloud. I don’t recommend this, rather export your file as it is more secure and less buggy.
Load Cloud Save - Loads up a save you have made. I don’t recommend this, rather export your file as it is more secure and less buggy.
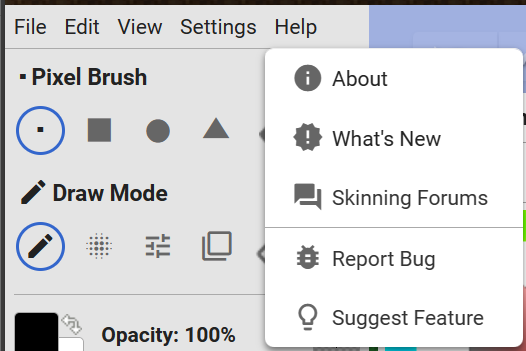 About - Brings up logo and copyright
What’s New - Brings up the newest fixes since last usage.
Skinning Forums - Brings up the forums for making skins, on PMC.
Report Bug - Brings up menu to report something
Suggest Feature - Brings up menu to make suggestions for features.
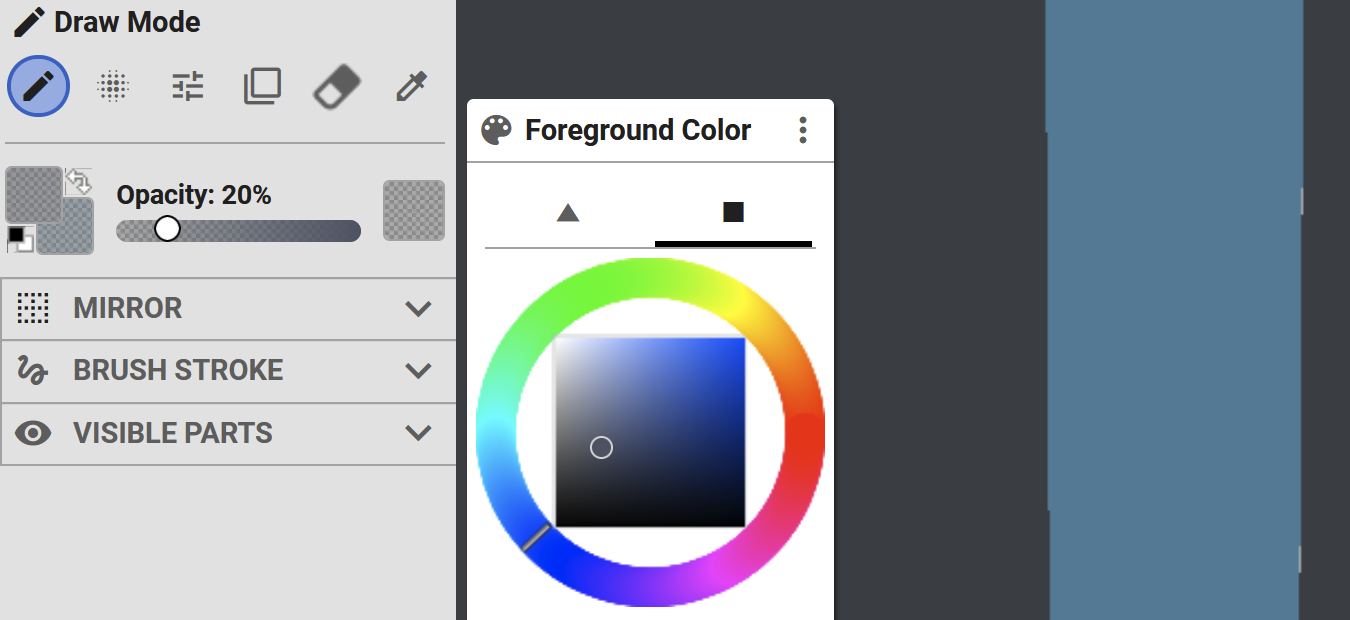
Moving downwards, we have the brushes. These select the area that you are going to fill with your foreground color
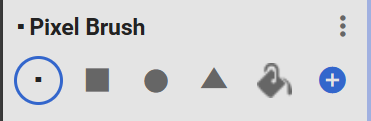
The pixel brush is a one pixel brush.
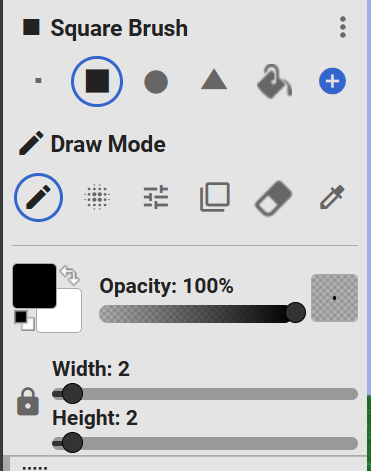
The square brush is a larger brush, that you can choose what size of, a menu will appear under the colors, for the size. You can customize it.


The circle and square brushes operate the same as the square brush, with being able to select the size, just different shapes, and with the triangle you can rotate it so the point faces different directions.
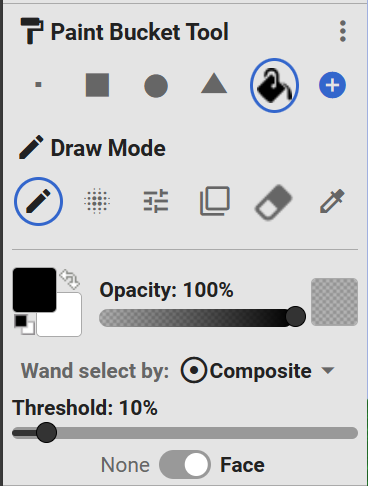 The paint bucket tool will replace a certain threshold, with color. If set at 0% it will only change the exact same color as the pixel clicked, that is touching that pixel. If set to 10% it will change every color that's 10% similar to the pixel. You can also control if it will just be on the face, or whether it will color the entire body that is similar.
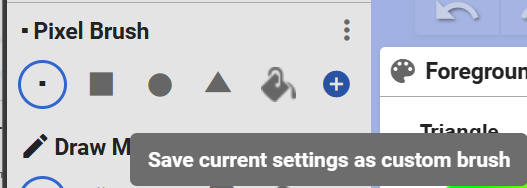 ❀ Lastly, you have the custom brush option. This is the blue “ + “ option. This will save the current size and color you have selected.
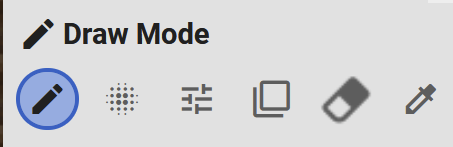 ✮ The first mode is draw mode, this will be placing color, your standard mode. With keyboard shortcuts, the normal keybind is B to switch to it.
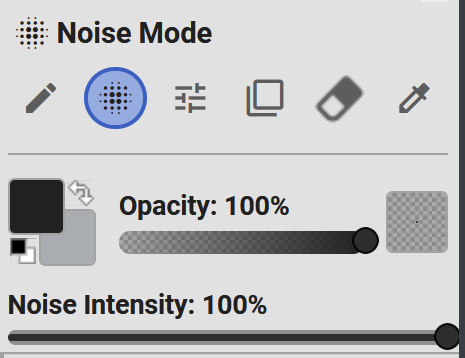 Next up you have is noise mode. Often beginner tailors use this to quickly add variation to a skins texture, though this isn’t recommended as it’s hard to have consistency. You can change the intensity or how extreme the noise is by the intensity bar below it!
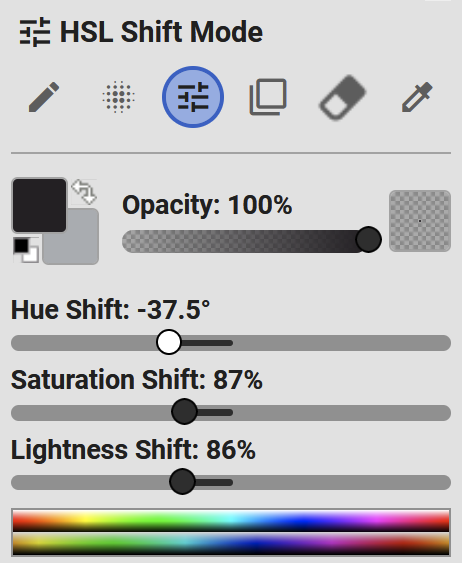 ❀ HSL shift mode is something I only recommend once you have a good grasp of the program. However this is a way to change colors easily. The top bar displayed is the normal colors, and under it, is how they would change.
The hue will change your color itself, so if you find that you made an outfit too blue, and you want it to be purple, you can shift the color itself.
The saturation will make it more or less vibrant, often bases and outfits won’t align the most in terms of saturation, so you can easily use that modifier to adjust it to match your character!
The lightness is how light or dark something is, so if a hair color for example is too light, you can easily make it darker.
Overall, typically you adjust multiple sliders at once to get the desired color you want!
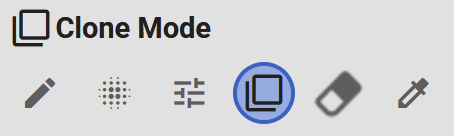 ❀ Clone mode is what’s used to “copy” and put a section onto your clipboard. Whatever pixels are selected in your brush if clicked will set it to your clipboard.
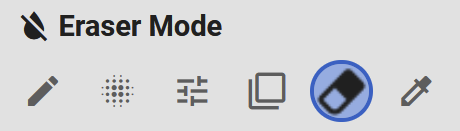 ✮ Eraser mode is very self explanatory, it will turn pixels transparent! Quickly switch to it with the keybind E.
 ✮ Color picker is used to choose colors that you’ve already put down on the skin. You can quickly switch to it with keybind ‘D’ It will choose colors to the background color, if set to that with foreground background choice.

For brush colors you have a display under your modes.
The color all the way to the left, is your foreground color, and the second color is your background color. This is really so you can save to colors and switch easily, with the arrow. The black box underneath that will reset it to pure black and white. ***It’s worth noting, that your background color is automatically the base color when you hit “new skin”.
The opacity will make your color selected only show partially over another color.
Lastly the box on the right is what the color and brush will look like combined.

 At the top you will be told whether or not you are changing the foreground, or background color.
Moving downwards you will find all of these options.
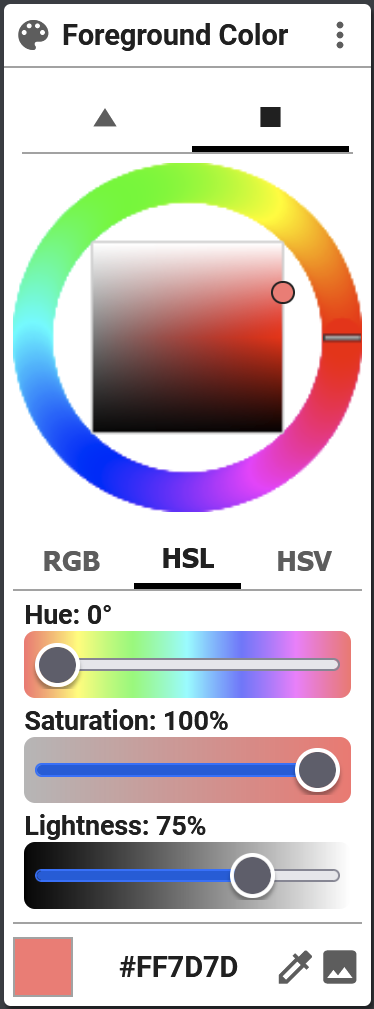
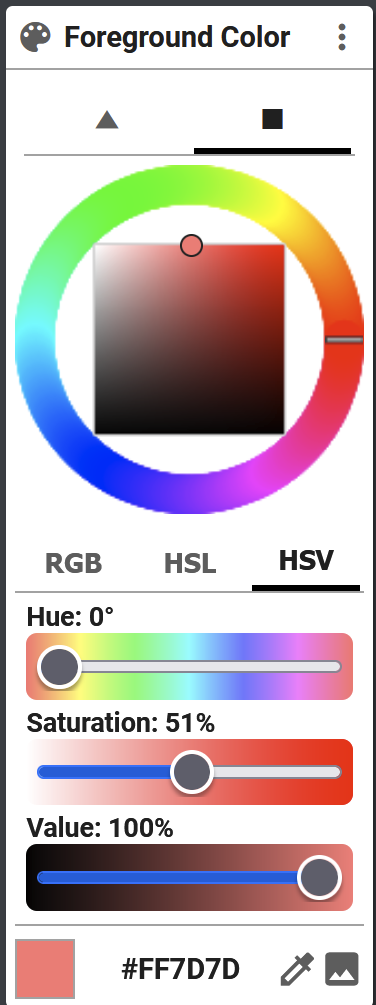
Triangle & Square - Chooses which view of the color will be chosen, whether the inside will be a triangle view that moves along with your hue chosen, or a square that is the same.
For sake of beginners, I recommend using the square as it can be hard to choose the same value with the triangle moving.
Color wheel - Then you have your actual color wheel, you can pick colors here based off of what they look like, not values.
RGB / HSL / HSV - These acronyms, meaning Red, Green, Blue / Hue, Saturation, Lightness / Hue, Saturation, Value are the different options you can choose for breaking apart the color. I do not recommend RGB as you get started as its harder to work with.
RGB - With your red, green, & blue selections you can choose hues a lot easier, adding up how much of each primary goes into your final color.
HSL - With hue, saturation, and lightness, you can select what basic color you would like easily, and then change the saturation and lightness based off of what tint/tone/shade you would like. The saturation will always be how colorful you would like the final color to be, and the lightness is how black or white you would like.
HSV - With hue, saturation, and value, it is very similar to HSL mode, you can select what basic color you would like easily, and then change the saturation and lightness based off of what tint/tone/shade you would like. The saturation will always be how colorful you would like the final color to be, however where it differs is with value where you can choose, from black point, how bright you would like the color.
Display of final color - Self explanatory, the color at the bottom left is what your final color chosen is.
Hexadecimal color code - The numbers listed, is the colors code. With this you can easily click on it to change values based off of the letter sequences, or you can easily enter a color that you found somewhere else, or copy the color from the skin to another application.
Color picker - Again, you have a color picker. This is another button that will easily swap you to the Color Picker Tool Mode.
Image reference - This is an easy way to add a reference image into your view, which if hovered over will automatically pick up colors.
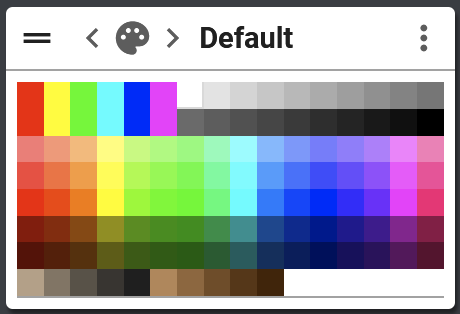 First of all. . Don’t use ANY of these colors. They are all awful.
Left and Right arrows - Used to swap between palettes you have
Palette name - Self explanatory
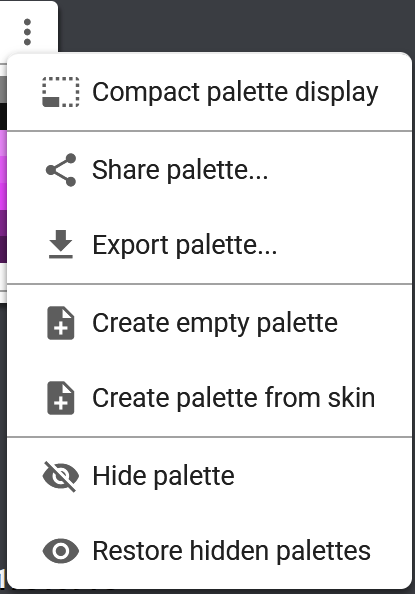
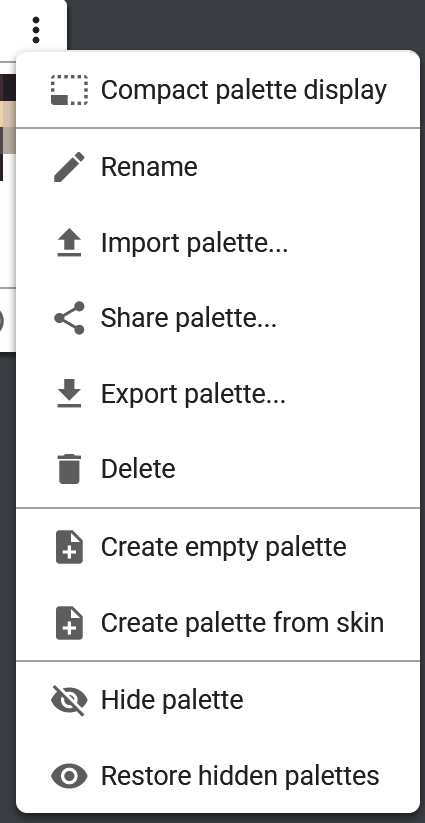 **The first image is the settings on the default palette, the second is on any other palette**
Compact palette display - Removes the name and arrows to switch between palettes.
Rename - Will rename any palette you have created
Import palette - Will allow you to upload palettes (gpl files) to your own palette.
Share palette - Makes a link to share the palette easily.
Export palette - Makes the palette into a gpl file that you can move easily between computers or send online.
Delete - Will allow you to delete a palette! Don’t worry, a pop up asks if you really want to do this, so you won’t accidentally delete your palettes.
Create empty palette - Makes a completely blank palette that you can add your own colors to.
Create empty palette from skin - Makes a new palette based off of your skin, though all of the colors tend to be in a messy order, so you have to slide them over to be in a way that’s easy to choose from.
Hide palette - Just makes the palette not visible when you look through your palettes.
Restore hidden palettes - Brings back a palette that was hidden.
Blank Palettes will look like this
Zoom in and out - Easily make your palette bigger or smaller.
Add or remove colors - Whatever color you have selected in your foreground will be added or removed from the palette.
Lastly, to adjust your palette you can click on the edges of the palette to size it up or down without affecting the colors sizes, and you can move colors between one another.
 As we move back to the left panel, you will find a section called mirror underneath your colors.
The mirror tool is used to have sections of the skin be recreated as you work on other parts of the skin, easily. You can easily visualize this by using it, and it’s harder to explain without visuals.
Surface vs Across limbs - Surface will allow other modifiers on that surface of the skin, across limbs will have repeating areas depending on the limb. (ex. Front face of right arm will be modified at the same time of front face left arm with across limbs chosen)
X axis - With the surface area chosen, you can make a reflection happen on that surface, across the x axis.
Y axis - With the surface area chosen, you can make a reflection happen on that surface, across the y axis.
Through - Makes the back side of the skin automatically look like the front, and either side look the same.
 Brush strokes affect how you can use your brushes on your skin.
Constant vs Builds up - Only really changes if you are not using 100% opacity. Constant will keep the same opacity throughout while you make a stroke, whereas builds up, will let opacity add up the more you go over the same pixel, without stopping your stroke.
Wrap model vs Surface lock - Affects whether or not a stroke will be able to move from the plane you are looking at onto the sides, or stays locked onto that surface.
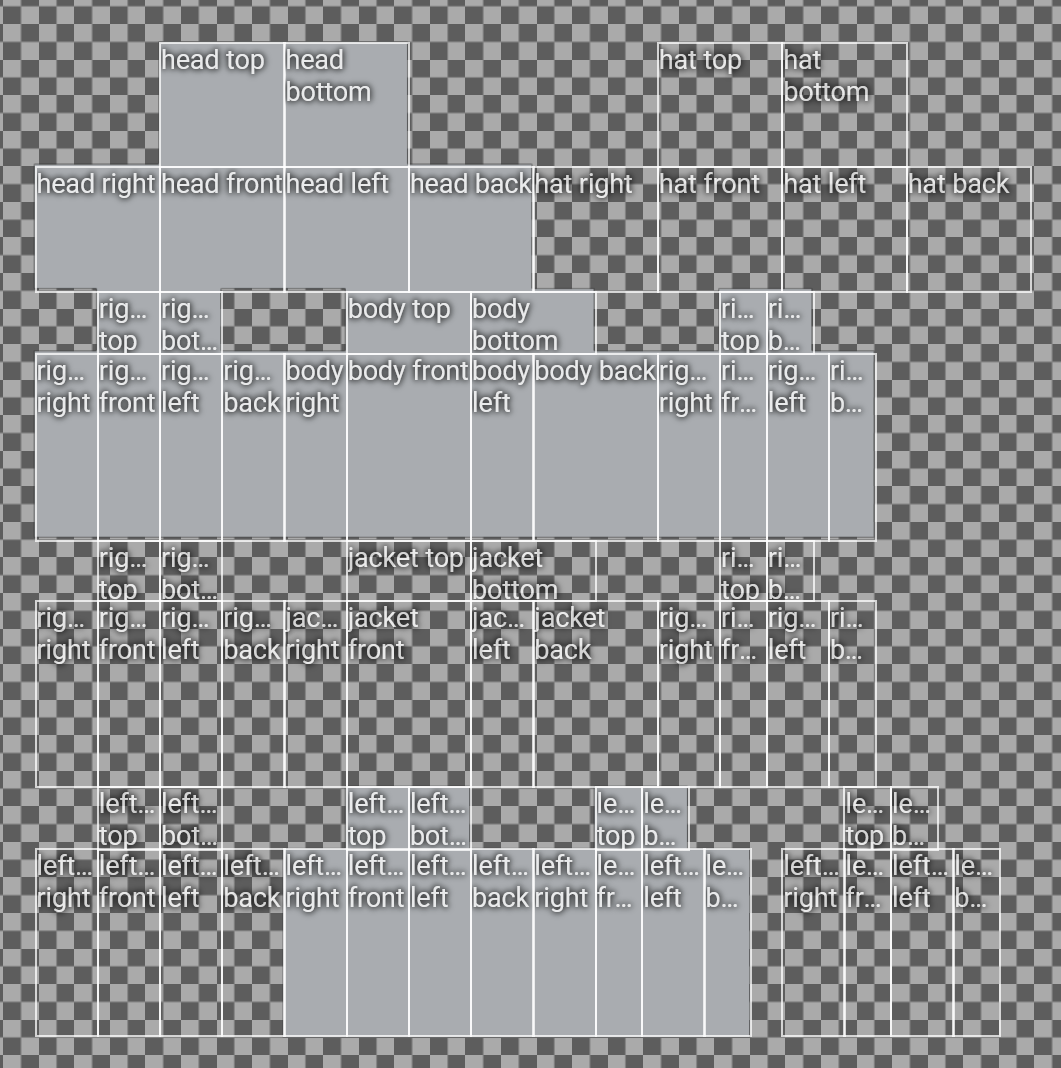
 This one requires little explanation, it is a menu that will let you choose what parts of the skin you want to look at. The circle will say whether the base and the overlay are being looked at, and then the square checkboxes are whether or not that part overlay, or part base is visible.
There is a much easier to comprehend view on the right hand panel.
Without further adieu, let's switch to the panel on the other side.
Right Panel
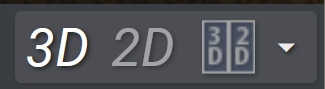 For creating skins the file is a 2d model, however when creating them and looking at them in-game they will be a 3d model. Using this option you can choose how to visualize it.
3D - Shows the model of the skin how it would look in game.
2D - Shows how the skin looks like as a file. **Worth noting, clicking 2d will remove a lot of sections from the right panel.
3D / 2D - Shows a model of both of them side by side.
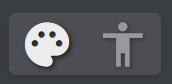
Creative mode - Displayed with a color palette icon, the creative mode will allow you to add color and actually design the skin.
Pose mode - Displayed with a figure icon, the pose mode changes your left panel into an easy to view model posing station. With this you can edit how limbs look to create a dynamic pose.
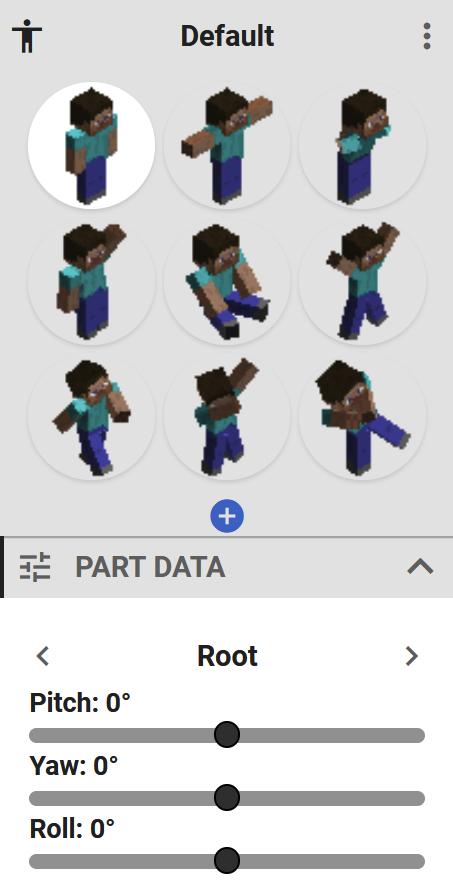 Blue + - This button allows you to save a pose that you have created.
Part Data - The part data section underneath the choice of basic models will allow you to edit your own with percentages. If you click on the left and right arrows, it will edit what part of the body you are modifying. You can also left click on different parts of the body, to do the same thing, without using percentages.
 The circular red icon in the center of the arm shows you what face you are modifying. Simply drag to move it forwards or backwards.
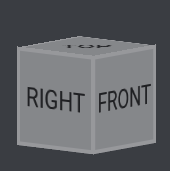 This cube will show you what face(s) of the skin you are looking at.
This is helpful to know if you are creating a skin facing backwards (it happens sometimes!!). You can click on one of these surfaces, and automatically snap the model to the right position.
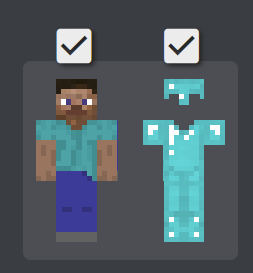
This is a 2d view of all the pieces that make up the skin.
The steve is the “base” layer, and the armor is your “overlay” layer.
Simple click on any part, to make it not visible. Selecting the arrow at the top of either will remove all of that option, so you can look at the base or the overlay by itself, while not having to click each part.
 Adds a grid over your skin. Using this will allow you to easily see between pixels, however, it’s harder to see the composition as a whole. I recommend keeping it off almost always.
 Changes the center of your camera, to somewhere you click on the skin, while keeping the other parts visible.
This is particularly useful if you want to be able to see the rest of the skin, but you are focusing on adding to one part of the skin and need it to be centered.
 Using this, it will add an overlay that tells you what part of the skin you are looking at.
 The zoom wheel will show how zoomed in you are. You can use this to select how zoomed you want to be, but also your scroll wheel on your mouse should do this same thing.
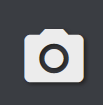 Takes a screenshot of the skin in your current view, and the background, and downloads it for you. There will also be a PMC logo mark in the bottom right corner.
 Downloads the skin as a file that you can upload to your minecraft.
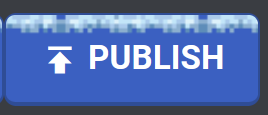 Brings up a menu which will allow you to create a public listing of the skin you made.
I will not be going into how to create a profile and publish skins, but you can do that on your own as its quite self explanatory.
Tricks
 I then place a layer where I want the shadows to be on the skin, and then continuously layer in controlled sections until I have the shape I like in terms of shadow.
Pressing “D” I select the original base color of the part I’m shading, then press “B”. I up the saturation using HSL mode.
Again, I lower the opacity, and add the first light value, and where it touches the flat color of what I’m shading, I add an extra bit of light.
Using either cloning methods, or mirror methods, I can quickly copy it to the other sides. Alternatively, in small areas I will just switch between “D” and “B” quickly placing color.
With that area saved, you can turn off overlay, press “C” again with the copied area, and copy a section from your base layer.
Make sure x-axis is turned off an apply the overlay again, and you can easily paste it on top to create an overlay in the way you like.
You can also save that brush with the blue + in your brushes menu.
For this, make sure to have your base skin opened up.
Next import image as brush with the three dots in the top right of your brushes panel. Select your outfit here.
Go to the 2D skin view, so you can see everything, and then use the outfit as a brush, and place it on top where the body overlaps. **MAKE SURE TO GET IT PERFECTLY ALIGNED!
Lastly, to add hair on top, open up your hair base the same way you did with the outfit, and apply it.
Now you can delete all of these brushes by right clicking them in your brushes menu.
THANK YOU FOR READING THIS EXTENSIVE GUIDE!!
If you are interested in learning how to make skins, please check out my guides.
How to Make a Base - https://schoolrp.net/threads/guide-how-to-make-a-base.78984/
How to Make Outfits - https://schoolrp.net/threads/guide-how-to-make-outfits.78985/
How to Choose Colors - https://schoolrp.net/threads/guide-how-to-choose-colors.79007/
Or check out one of these lovely other guides:
Bheom’s Somewhat Helpful Guide to Tailoring
https://schoolrp.net/threads/tailoring-a-somewhat-helpful-guide-to-tailoring.70855/
C3rt1fied’s Tailoring Tools and Information
https://schoolrp.net/threads/☆-srp-☆tailoring-tools-information.70717/
Kustomzero’s Guide to Color Theory and Hue Shifting
https://schoolrp.net/threads/guide-color-theory-and-hue-shifting.70731/
JustjuiceHex’s PMC Shading Tool Guide / 2024
https://schoolrp.net/threads/pmc-shading-tool-guide-2024.75680/
Cho0ii’s Skin Shading Guide
https://schoolrp.net/threads/skin-shading-guide.68048/
Lovelylyric’s Guide to Shading Hair
https://schoolrp.net/threads/a-guide-to-shading-srp-hair-female.69102/
A guide by Zrle
This is my guide to utilizing every single part of PMCskin3D. This goes over every single little tool that PMC has to offer, so that way anyone can be knowledged on the tools it offers.
Also SHOUTOUT to Noss and all the other Skindex users who are the reason I’m making this guide. PMC has a large variety of tools that are made to help you, not be complicated.
ADDITIONALLY, all of these tools can be found simply by scrolling down while having PMC open, and it has its own guide. This is for me to use as a reference so that way I can make shading guides, and other people can use this as a reference if I mention a tool they don’t know.
Table of Contents
Introduction
Tool Explanation
- Toolbar Options
1a. File
1b. Edit
1c. View
1d. Settings
1e. Help
- Brushes
- Modes
- Color
4a. Brush Color
4b. Color Wheel
4c. Color Palettes
- Mirror
- Brush Stroke
- Visible Parts
- 3D vs 2D vs Both
- Creative Mode vs Pose Mode
- Planes Viewer
- Body Viewer
- Grid
- Camera Center
- Toggle Overlay
- Zoom
- Screenshot
- Publish
- Shading Quickly
- Cloning
- Removing Base
- Applying Outfits
Tool Explanation
Toolbar
File
Under “File” you will find all these commands
HD Skin Option will allow you to create an “HD skin” which is basically a higher quality skin, with more pixels to work with.
✮ Open File - Will allow you to open a pre-existing skin, once again, you can choose the specific details of your skin.
Get from MC username - exactly what it sounds like, it will take the current skin from a username.
Take screenshot - Just takes a screenshot of your workspace, and the skin!
✮ Import Reference Image - This will take an image you have, and have it open as an image next to your skin. Hovering over any part of the image will copy the color into your foreground color
You can adjust the size of the image and move it around by hovering over the name, and when you don't need it, click the X button.
✮ Save to file - Downloads skin file as an image.
Publish to PMC - Will bring up controls to set your image up on your PMC profile
Edit
Under “Edit” you will find all these commands
✮ Redo - Goes forward to where you were before latest undo.
Increase Resolution 2x - Will divide each pixel into 4, making it a higher quality skin, (HD skins)
Decrease Resolution 2x - Will take existing 4 pixels and combine them into one, making the skin have less quality, or appear “blockier”
Convert To Steve - Will take existing skin and make the arms pixel one bigger.
Convert To Alex - Will take existing skin and make the arms pixel one smaller.
View
Under “View” you will find all these commands
Fillscreen - Will make the web-page fit your screen better, though it glitches so I wouldn’t use it.
Use Cursors - Will give the cursor a “ + “ symbol, versus the normal curser.
Grid - Will give the model a grid, I recommend not using this as it makes it harder to see what you’re doing.
Texture Overlay - Honestly. I have no idea what this does. It’s not important.
Body - Turns a body visibility off / on
Armor - Turns a overlay visibility off / on
Zoom In - Manually zooms you closer into the figure. Also can be done with scroll wheel.
Zoom Out - Manually zooms you further from the figure. Also can be done with scroll wheel.
Sky Color - Changes the background color.
Grass Color - Changes the grass texture, you can also remove it here!
Setting
Under “Setting” you will find all these commands
✮ Keyboard Shortcuts - Brings up a menu to view current key shortcuts, you can also change them here.
Reset tools & brushes - What it sounds like, it will reset your station.
Export Database - What it sounds like, it will take your data and export it into a file.
Import Database - What it sounds like, it will take a data file and replace your current data with it.
Reset Database - What it sounds like, it will erase all current data.
Enable Cloud Saves - Will load up a cloud to save it to. I don’t recommend this, rather export your file as it is more secure and less buggy.
Manual Cloud Save - Creates a save in the cloud. I don’t recommend this, rather export your file as it is more secure and less buggy.
Load Cloud Save - Loads up a save you have made. I don’t recommend this, rather export your file as it is more secure and less buggy.
Help
Under “Help” you will find all these commands
What’s New - Brings up the newest fixes since last usage.
Skinning Forums - Brings up the forums for making skins, on PMC.
Report Bug - Brings up menu to report something
Suggest Feature - Brings up menu to make suggestions for features.
Brushes
Moving downwards, we have the brushes. These select the area that you are going to fill with your foreground color
The pixel brush is a one pixel brush.
The square brush is a larger brush, that you can choose what size of, a menu will appear under the colors, for the size. You can customize it.
The circle and square brushes operate the same as the square brush, with being able to select the size, just different shapes, and with the triangle you can rotate it so the point faces different directions.
Modes
After you have moved on from brushes, you can see the different modes!
The hue will change your color itself, so if you find that you made an outfit too blue, and you want it to be purple, you can shift the color itself.
The saturation will make it more or less vibrant, often bases and outfits won’t align the most in terms of saturation, so you can easily use that modifier to adjust it to match your character!
The lightness is how light or dark something is, so if a hair color for example is too light, you can easily make it darker.
Overall, typically you adjust multiple sliders at once to get the desired color you want!
Colors
Colors are possibly the hardest part of making skins. However setting up your colors settings will help make choosing colors a lot easier!Brush Color
For brush colors you have a display under your modes.
The color all the way to the left, is your foreground color, and the second color is your background color. This is really so you can save to colors and switch easily, with the arrow. The black box underneath that will reset it to pure black and white. ***It’s worth noting, that your background color is automatically the base color when you hit “new skin”.
The opacity will make your color selected only show partially over another color.
Lastly the box on the right is what the color and brush will look like combined.
Color Wheel
On your color wheel you will find all of these different selections
Moving downwards you will find all of these options.
Triangle & Square - Chooses which view of the color will be chosen, whether the inside will be a triangle view that moves along with your hue chosen, or a square that is the same.
For sake of beginners, I recommend using the square as it can be hard to choose the same value with the triangle moving.
Color wheel - Then you have your actual color wheel, you can pick colors here based off of what they look like, not values.
RGB / HSL / HSV - These acronyms, meaning Red, Green, Blue / Hue, Saturation, Lightness / Hue, Saturation, Value are the different options you can choose for breaking apart the color. I do not recommend RGB as you get started as its harder to work with.
RGB - With your red, green, & blue selections you can choose hues a lot easier, adding up how much of each primary goes into your final color.
HSL - With hue, saturation, and lightness, you can select what basic color you would like easily, and then change the saturation and lightness based off of what tint/tone/shade you would like. The saturation will always be how colorful you would like the final color to be, and the lightness is how black or white you would like.
HSV - With hue, saturation, and value, it is very similar to HSL mode, you can select what basic color you would like easily, and then change the saturation and lightness based off of what tint/tone/shade you would like. The saturation will always be how colorful you would like the final color to be, however where it differs is with value where you can choose, from black point, how bright you would like the color.
Display of final color - Self explanatory, the color at the bottom left is what your final color chosen is.
Hexadecimal color code - The numbers listed, is the colors code. With this you can easily click on it to change values based off of the letter sequences, or you can easily enter a color that you found somewhere else, or copy the color from the skin to another application.
Color picker - Again, you have a color picker. This is another button that will easily swap you to the Color Picker Tool Mode.
Image reference - This is an easy way to add a reference image into your view, which if hovered over will automatically pick up colors.
Color Palettes
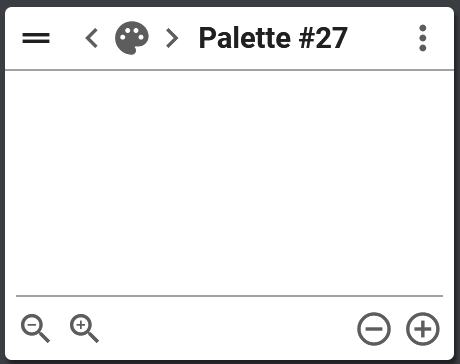
Your color palette will automatically look like this based off of default
Left and Right arrows - Used to swap between palettes you have
Palette name - Self explanatory
Compact palette display - Removes the name and arrows to switch between palettes.
Rename - Will rename any palette you have created
Import palette - Will allow you to upload palettes (gpl files) to your own palette.
Share palette - Makes a link to share the palette easily.
Export palette - Makes the palette into a gpl file that you can move easily between computers or send online.
Delete - Will allow you to delete a palette! Don’t worry, a pop up asks if you really want to do this, so you won’t accidentally delete your palettes.
Create empty palette - Makes a completely blank palette that you can add your own colors to.
Create empty palette from skin - Makes a new palette based off of your skin, though all of the colors tend to be in a messy order, so you have to slide them over to be in a way that’s easy to choose from.
Hide palette - Just makes the palette not visible when you look through your palettes.
Restore hidden palettes - Brings back a palette that was hidden.
Blank Palettes will look like this
Zoom in and out - Easily make your palette bigger or smaller.
Add or remove colors - Whatever color you have selected in your foreground will be added or removed from the palette.
Lastly, to adjust your palette you can click on the edges of the palette to size it up or down without affecting the colors sizes, and you can move colors between one another.
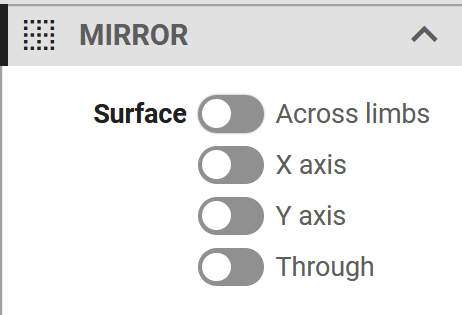
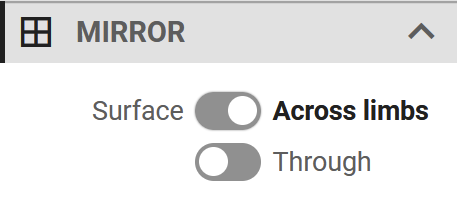
Mirror
The mirror tool is used to have sections of the skin be recreated as you work on other parts of the skin, easily. You can easily visualize this by using it, and it’s harder to explain without visuals.
Surface vs Across limbs - Surface will allow other modifiers on that surface of the skin, across limbs will have repeating areas depending on the limb. (ex. Front face of right arm will be modified at the same time of front face left arm with across limbs chosen)
X axis - With the surface area chosen, you can make a reflection happen on that surface, across the x axis.
Y axis - With the surface area chosen, you can make a reflection happen on that surface, across the y axis.
Through - Makes the back side of the skin automatically look like the front, and either side look the same.
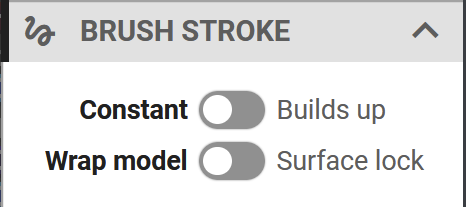
Brush Stroke
Your brush stroke panel only has two different options
Constant vs Builds up - Only really changes if you are not using 100% opacity. Constant will keep the same opacity throughout while you make a stroke, whereas builds up, will let opacity add up the more you go over the same pixel, without stopping your stroke.
Wrap model vs Surface lock - Affects whether or not a stroke will be able to move from the plane you are looking at onto the sides, or stays locked onto that surface.
Visible parts
There is a much easier to comprehend view on the right hand panel.
Without further adieu, let's switch to the panel on the other side.
Right Panel
3D vs 2D vs Both
3D - Shows the model of the skin how it would look in game.
2D - Shows how the skin looks like as a file. **Worth noting, clicking 2d will remove a lot of sections from the right panel.
3D / 2D - Shows a model of both of them side by side.
Creative Mode vs Pose Mode
Creative mode - Displayed with a color palette icon, the creative mode will allow you to add color and actually design the skin.
Pose mode - Displayed with a figure icon, the pose mode changes your left panel into an easy to view model posing station. With this you can edit how limbs look to create a dynamic pose.
Part Data - The part data section underneath the choice of basic models will allow you to edit your own with percentages. If you click on the left and right arrows, it will edit what part of the body you are modifying. You can also left click on different parts of the body, to do the same thing, without using percentages.
Planes Viewer
This is helpful to know if you are creating a skin facing backwards (it happens sometimes!!). You can click on one of these surfaces, and automatically snap the model to the right position.
Body Viewer
This is a 2d view of all the pieces that make up the skin.
The steve is the “base” layer, and the armor is your “overlay” layer.
Simple click on any part, to make it not visible. Selecting the arrow at the top of either will remove all of that option, so you can look at the base or the overlay by itself, while not having to click each part.
Grid
Camera Center
This is particularly useful if you want to be able to see the rest of the skin, but you are focusing on adding to one part of the skin and need it to be centered.
Toggle Overlay
This is a 2D panel item, and the only exclusive one that's not in the 3D menu.
Zoom
Screenshot
Download
Publish
I will not be going into how to create a profile and publish skins, but you can do that on your own as its quite self explanatory.
Tricks
Shading Quickly
To shade quickly, I chose my darkest value and lower the opacity of the brush.
Pressing “D” I select the original base color of the part I’m shading, then press “B”. I up the saturation using HSL mode.
Again, I lower the opacity, and add the first light value, and where it touches the flat color of what I’m shading, I add an extra bit of light.
Using either cloning methods, or mirror methods, I can quickly copy it to the other sides. Alternatively, in small areas I will just switch between “D” and “B” quickly placing color.
Cloning
Using the overlay, you can make an area using your basic pixel brush. With that you can copy it using a square brush with height and width being large and pressing “C”.With that area saved, you can turn off overlay, press “C” again with the copied area, and copy a section from your base layer.
Make sure x-axis is turned off an apply the overlay again, and you can easily paste it on top to create an overlay in the way you like.
You can also save that brush with the blue + in your brushes menu.
Removing Base
When creating an outfit, you typically use a base tone, whether it is gray or skin toned. To remove this, simply use the fill tool, along with erase brush, make sure “none” is selected in the left panel instead of “face.” Then you can click anywhere on the color you want removed and it will remove that entire color.Applying Outfits
If you have a base you can easily apply outfits using PMC and no other applications.For this, make sure to have your base skin opened up.
Next import image as brush with the three dots in the top right of your brushes panel. Select your outfit here.
Go to the 2D skin view, so you can see everything, and then use the outfit as a brush, and place it on top where the body overlaps. **MAKE SURE TO GET IT PERFECTLY ALIGNED!
Lastly, to add hair on top, open up your hair base the same way you did with the outfit, and apply it.
Now you can delete all of these brushes by right clicking them in your brushes menu.
THANK YOU FOR READING THIS EXTENSIVE GUIDE!!
If you are interested in learning how to make skins, please check out my guides.
How to Make a Base - https://schoolrp.net/threads/guide-how-to-make-a-base.78984/
How to Make Outfits - https://schoolrp.net/threads/guide-how-to-make-outfits.78985/
How to Choose Colors - https://schoolrp.net/threads/guide-how-to-choose-colors.79007/
Or check out one of these lovely other guides:
Bheom’s Somewhat Helpful Guide to Tailoring
https://schoolrp.net/threads/tailoring-a-somewhat-helpful-guide-to-tailoring.70855/
C3rt1fied’s Tailoring Tools and Information
https://schoolrp.net/threads/☆-srp-☆tailoring-tools-information.70717/
Kustomzero’s Guide to Color Theory and Hue Shifting
https://schoolrp.net/threads/guide-color-theory-and-hue-shifting.70731/
JustjuiceHex’s PMC Shading Tool Guide / 2024
https://schoolrp.net/threads/pmc-shading-tool-guide-2024.75680/
Cho0ii’s Skin Shading Guide
https://schoolrp.net/threads/skin-shading-guide.68048/
Lovelylyric’s Guide to Shading Hair
https://schoolrp.net/threads/a-guide-to-shading-srp-hair-female.69102/
Last edited:


