INFORMATION
This is a small guide on tailoring and how to tailor, I decided to make this considering the fact I've been asked many times for tutorials and tips- to teach people how to tailor. I've been tailoring for a year now for SRP, I've mastered many shading types now and I'd like to give a small little secret recipe thingy to those reading through this.
There's a few tailoring forums up already on how to tailor and what to use, check these links below to follow up into their forums!
@kairi 's hair guide | Press me! (ˊ▽ˋ*)
@C3rt1fied 's tailoring guide | Press me! (ˊ▽ˋ*)
@cho0ii 's skin shading guide | Press me! (ˊ▽ˋ*)
TOOLS NEEDED
- Patience . .
(It's okay I don't have this either, but we can get through it together!)
- A helpful one would be using PMCSkin3D!
It doesn't hurt to try the basics with this.
- A reference
It's always good to have a reference if you're just starting, even those who have been tailoring for some time still need references!
NAVIGATING TOOLS | QUICK RUN DOWN
FILE | VIEW
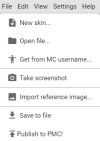
The file button on the top left side shows a few basic options you may use!
| NEW SKIN New skin is to start from complete scratch, pressing new skin you'll see a window pop up saying model, here you'll press the options and press Alex (3 pixel arms). Your base color will be the color of the skin you'd like to make, it can be any color! OPEN FILE Opening a file is a lot easier than having to make things from scratch, if you have a base already, press open file and find your base inside of your files folder. You should totally press the same option as NEW SKIN. TAKE SCREENSHOT This option is to take a screenshot of your skin, it helps to track process as well as show off your skin instead of having to continuously crop. Simply you can turn your skin around to how you'd like, make it pose, etc. Press the camera button or FILE > TAKE SCREENSHOT and you've got yourself a screenie of your skin! IMPORT REFRENCE IMAGE Importing a reference is sooo much more easier than having to scroll and hit tab in and out to different google tabs, from Pinterest to PMC. Or even having to use a color dropper extension on a skin, simply just download your image and press the import reference image. You're able to color steal and zoom in and out of your picture! SAVE TO FILE This is a big one you should keep in mind of before leaving your PMC tab, always save your skins and download your progress! |
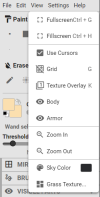
| FULLSCREEN It's nice to have it a big screen, not my personal pick but, if you like your screen just the entire thing- press this! GRID Completely up to you if you want the grids on or not, I personally don't like it but, up to you if you'd like them! They're there to help placement of squares. SKY COLOR This option can bring out your colors that you use on your skin if you do know what colors match with what, it's also nice to have a prettier background than the basic Minecraft one . . :3 GRASS TEXTURE I personally take it off and change my sky color, up to you if you want it on or off, it looks a bit funny to me. |
TAILORING GUIDE | bheom shading v.3
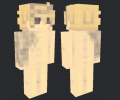
You'd be crazy to think I'd share everything, this is simply a guide of how to master one of my other shading styles. I suggest to adapt from this one and find your own comfortable style, everyone has different styles! Please don't steal everything color by color pixel by pixel, cause then that's plagiarism! Follow this guide with your own things, get used to tailoring, and I'm sure you'll do great. I once started off a nameMC too, shocker. You'll go from this to this, shown in the image below.

We'll be going through how to do bases; you'll understand how to do clothes the moment you know how to do base shaping. Don't worry, it's not too hard.
HEAD MAKING | The start of a base!
STEPS (TEXT VERSION)
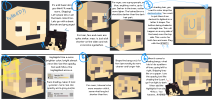
1. It's a bit basic don't you think? It needs more.. Shaping! Let's place down all the basic colors! Um.. Lets go with a basic blonde and grey eyes!
2. For hair, fem and masc are quite similar, masc is just a bit shorter on the sides and not excessive eyelashes. For eyes, use a grey-purple, or blue, anything works, up to you. Darker in the inner, outter more lighter. The lashes/brows should be darker than the dark hair part.
3. For shading hair, you want to color drop the darkest color. You want to put them from darkest to lightest in a letter U shape. The bottom being shaded in a straight line. This will happen on every side of the head, even the top side. This works for both fem and masc. Play with the OPACITY!
4. Highlights! Use a more brighter color, bright almost neon like. Use the opacity tool and follow the highlighted arrows. Face shading, makes it look yummier, more real. Use opacity and a grey-purple.
5. Baannngs! For masc, I choose to be more messier with it, somewhat long but shorter than fem. Shape the bangs out, for fem I personally do more cleaner and longer hair.
6. When it comes to shading bangs, what I do is I do a pattern of lines, going left to right. Skipping lines like on a paper. I use the opacity tool like shading the U part. I go from light to dark. I then add the highlights from step 4! Now.. You haveee... A HEADD!
TORSO MAKING | The main part of a base!
STEPS (TEXT VERSION)
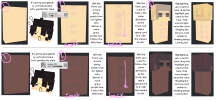
1. It’s giving spongebob or unfrosted cake. Let’s yassify this cake.
2. With the front, use a more pinky-peach tone for lighter skin, darker a more grey-purple hue. Follow the little lines.
With the back, you want to follow the same directions as the front- but add a spinal cord to it with the square brush.
3. Highlighting, you want to color drop the highlight you used on the face. That more bright- neon like color. Shading the torso is most similar to shading bangs. Line by line.
Now you have yourself a head and torso!
BASE MAKING | The arms and legs!
STEPS (TEXT VERSION)
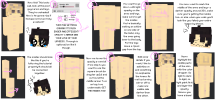
1. Now this! This looks sad, look at the poor guys arms and legs.. They’re unshaded! How is he gonna rizz if his base isn’t even fully existent?
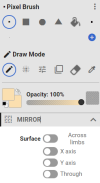
2. TURN THE SETTINGS ONNNNN! IT’S MUCH EASIER AND EFFECIENT! OPACITY X MIRROR ARE YOUR LOVE OF YOUR LIIIVEESS.. Through is optional; Ion like it though.
3. You want to go down with light opacity on the arms and legs, make sure to get the insides. You’re basically making an outline on one side of the limbs; only the ones going inner to the body. For the legs leave a 1 pixel gap from the top.
4. You now want to mark the middle of the arms and legs- a darker opacity around 35%, make sure you’re getting the insides too- or else when you walk you’ll look like you failed your entire lesson by bheom. The insides should look like this if you’re following the tutorial properly! It should all be connected together.
5. Now we lower the opacity a wee bit from step 4, you want to use the square brush (or singular up2u) and surround the middle areas. Two on top, two underneath. GET THE INSIDES TOO!
6. Add some details if you want, I like to add elbows and something to emphasize the knees. As well as turning mirror off to make one middle side darker than the other.
7. Noow highlight the middle parts of the skin with the color dropper. Go light to dark to light, so light paint first and layer the opacity. Nooow you have a base!
CLOTHES
When it comes to making clothes; it's no different from shading a body- just different colors. I know you can do it! Play around with shading styles, have fun with adapting your tailoring!
ENDING NOTES
HUUUGEEEE thank you to those who have been ordering from me since the beginning, those that spend their whole paycheck for tailoring and provide nitro and actual money for me. Tailoring is honestly a fun hobby, I'm sure you'll get through it.
SHOUT OUTS:
TOP 3 OG CUSTOMERS | Not in order.
- windswake
- hyunjqu
- m0rsari3s
TOP 3 AUCTION BIDDERS
I'm not mentioning anyone, you all spend too much money when I auction things.
INSPIRATIONS WHEN I STARTED
- noss69
- AllenBUwU
okie byebye have fun w using this :3 if u have questions and want more tips lmk in the replies xox
Last edited:


